Tutorial: How to Select Colors
DitDit currently uses several different types of color selectors, but we'll eventually replace all of the old color selectors with the newest one. This tutorial will show you how to use all of the different color selectors.
Spectrum Color Picker
The spectrum color picker allows you to select any color you want -- including translucent colors.
Here's what the control looks like on the page:

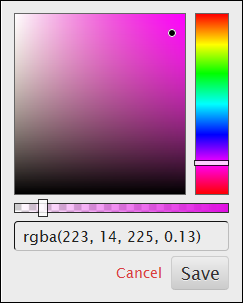
To select a color simply simply click on the control and a dialog will pop up:

The dialog consists of four areas that you can use to create your desired color:
1) The Color Input Text Box:
 Click on the text box and enter a color. You can use good old-fashioned English colors like "red" and "blue" -- or you can copy those scary-looking RGBA- or RGB-formatted color codes from one color picker and paste it into another. Hit the 'Enter' key to tell it you're done typing, and it will display the color you have entered. NOTE: To unset the color selector so that it's not displaying any color, delete the text in the text box and hit 'Enter'.
2) The Opacity Slider:
 Slide the rectangular slider to the right to make the color more opaque and slide it to the left to make it less opaque. The more you can see the gray and white checkerboard pattern beneath the color, the more translucent (invisible) the color is.
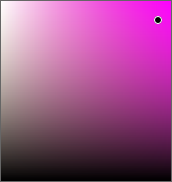
3) The Mixing Palette:
 Click on the mixing field (or drag the black dot) to determine which shade you want to select. To select white, drag the dot as far as it will go to the upper left (or just type 'white' in the text box below and hit return). To select black, drag the dot as far as it will go to the bottom left (or type 'black' in the text box below).
NOTE: If clicking on the palette doesn't change the color, check to make sure the opacity slider isn't all the way to the left.
4) The Color Palette Slider:
 Click on color palette slider to select the base color from which you want to select a shade (using the mixing palette). NOTE: If clicking on the palette doesn't change the color, check to make sure the opacity slider isn't all the way to the left.
Save Button:
Click the save button at the bottom of the dialog to save your selected color.
Cancel Button:
Click the Cancel Button if you want to go close the dialog and go back to the original color.
Selecting "No Color":
Selecting "No Color" is very different from selecting a fully transparent color -- even though the color picker control currently looks identical in the two cases. A blank selection ("No Color") means that the system is free to display the default color for the property in question, whereas a "transparent" selection forces the system to use "transparent" as the color -- which will override any set defaults.
Here's what the control looks like on the page:

To select a color simply simply click on the control and a dialog will pop up:

The dialog consists of four areas that you can use to create your desired color:
1) The Color Input Text Box:
 Click on the text box and enter a color. You can use good old-fashioned English colors like "red" and "blue" -- or you can copy those scary-looking RGBA- or RGB-formatted color codes from one color picker and paste it into another. Hit the 'Enter' key to tell it you're done typing, and it will display the color you have entered. NOTE: To unset the color selector so that it's not displaying any color, delete the text in the text box and hit 'Enter'.
2) The Opacity Slider:
 Slide the rectangular slider to the right to make the color more opaque and slide it to the left to make it less opaque. The more you can see the gray and white checkerboard pattern beneath the color, the more translucent (invisible) the color is.
 3) The Mixing Palette:
 Click on the mixing field (or drag the black dot) to determine which shade you want to select. To select white, drag the dot as far as it will go to the upper left (or just type 'white' in the text box below and hit return). To select black, drag the dot as far as it will go to the bottom left (or type 'black' in the text box below).
 NOTE: If clicking on the palette doesn't change the color, check to make sure the opacity slider isn't all the way to the left.
4) The Color Palette Slider:
 Click on color palette slider to select the base color from which you want to select a shade (using the mixing palette). NOTE: If clicking on the palette doesn't change the color, check to make sure the opacity slider isn't all the way to the left.
Save Button:
Click the save button at the bottom of the dialog to save your selected color.
Cancel Button:
Click the Cancel Button if you want to go close the dialog and go back to the original color.
Selecting "No Color":
Selecting "No Color" is very different from selecting a fully transparent color -- even though the color picker control currently looks identical in the two cases. A blank selection ("No Color") means that the system is free to display the default color for the property in question, whereas a "transparent" selection forces the system to use "transparent" as the color -- which will override any set defaults.
Old Color Selectors (To Be Phased Out Soon)
The text widget edit dialog currently uses an old-fashioned color picker which looks like this when it's closed:

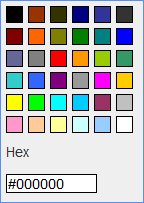
When you click on the control it opens a dialog that looks like this:

To select a color that's not included in the color palette, select the text in the text box and either paste or type the new color in as text.

When you click on the control it opens a dialog that looks like this:

To select a color that's not included in the color palette, select the text in the text box and either paste or type the new color in as text.

Need More Help?
To keep our prices dirt cheap, DitDat is a self-service tool.
If you need help, look here:
- The FAQ Page (Frequently Asked Questions).
- Email the other people in your cohort.
- The Newbie Forum.
- Ask a question at the next DitDat online seminar.
- DitDat Customer Support. (This will cost something! This is how we keep your basic prices low.)
Copyright © 2018 DitDat, Inc.
